Let me start with a quick introduction. My name is Pam Morris and I have been a demonstrator with Stampin’Up! since 2001. In March of 2012 I made the decision to drop and sign back up under Mary. It was one of the best decisions I have made in all my years as a demo. Less than a week later I was contacted by a local stamper who was interested in getting back into stamping. I was thrilled to begin recruiting and couldn’t be happier to sign my first downline, Brian King. Weeeee…Let the fun begin, right? Little did I know that my business would put me smack dab in the middle of a Fish and a King! I feel that I have some pretty big shoes to fill but there is no place that I would rather be.
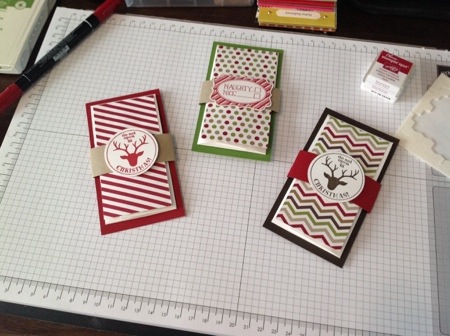
My project today is a long time favorite of mine. I have been making these envelope gift card holders for over 10 years. I keep them current by using Stampin’Up! products that are always on trend. I love the design and colors in the Seasons of Style Designer Series Paper that you can find in the 2013 Holiday Catalog. It pairs perfectly with the Very Merry Tags set. I have a picture tutorial to help you see how I made these cards that your friends and family would be thrilled to receive.

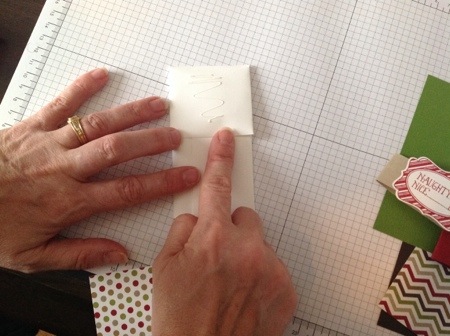
You first start with one of our standard envelopes. Score it at 4″ and then flip it and score again at 4″. I like to use my bone folder or stylus when scoring envelopes with my trimmer because it gives a deeper score through the layers. Once scored, open the envelope flap and fold in on the score lines as shown.


Add adhesive to the outside flap only and adhere a piece of 2 1/8 x 4 1/4 designer paper to the flap. When you open the envelope up you have a perfect sized pocket for a standard sized gift card or some cold hard cash if you wish.

You can tie it up with a ribbon or a belly band as i did. I took a piece of 1″ x 7″ card stock and loosely (so that you can easily slide it off) wrap it around and add your embellishment. I used stamped images and pop dotted them onto the belly band. You can also see that I glued the envelope onto a piece of 2 5/8 x 4 7/8 coordinating card stock to give it an extra layer of WOW.

I hope you learned a little something new today and will give these a try. It makes an impersonal gift card a gift from the heart!
Thank you for stopping by Tap Tap Stamp on my opening day. I hope you come back soon!
~Pam

Thanks for such a cute and practical project!!! They are soooo cute!
Thank you for stopping by! So glad you like my first project…..more to come!
LOVE, LOVE, LOVE this adorable cute and easy project!!!! And just in time for Christmas!! You rock Pam!!!
Thank you Linda! I look forward to sharing more.
So what if you’re between a Fish & a King…right now you’re the Queen Bee. Great job on the gift card. It’s so simple & very creative.
You are so sweet Faye!!! Thank you for the wonderful compliment!
This is a wonderful project to use as your premier post! I’ll definitely be making use of your well-done directions to make some of these puppies. Hope you heal up completely ASAP, and CONGRATLATIONS on getting your blog up and running–can’t wait to see what’s next!
Terri! Thank you so much for your sweet comment. I always love hearing from you. I am so glad you like my project. I made a ton of them this year! (hugs)
I love your idea for a gift card Pam! Thanks for sharing this and congratulations on your brand new blog! Looking forward to seeing more. Darlene
Thank you Darlene! I appreciate the kind words!
Great project Pam. Thanks so much for sharing your tutorial with us! The gift card out of an envelope is Brilliant and it looks to be easy enough for me to make. So cute!!!
Yes Lynn, they are sooooo easy and quick! You can crank out a bunch of these in no time. Thank you for stopping by and taking the time to comment.
I liked your gift card holder idea! Thanks for the tip about scoring with the trimmer with the bone folder for a deeper score. Congrats on your new blog. Yep, I came via Mary Fish’s blog. You do have some wonderful and talented people with Brian and Mary and the rest of the Pals. Looking forward to seeing more of your work.
Thank you Chris! I saw that trick at convention one year and was amazed I never thought of it. Thank you for coming by to see my blog. I agree that I am surrounded by some very inspiring talent!
Quick and classy! Thanks for sharing your how-to! Wendy
Congrats on your new blog! Love the design of your gift card holder. Will be casing this design, Thanks for sharing! Brenda
Thank you so much Brenda! They are great little cards. They work for all kinds of occasions too.
Thank you Wendy! They are a lot of fun to make too!
I also came to you through Mary’s blog. I love your project and will be making one today! Congrats on your blog which I am going to follow!
Thank you Laurene! I am so excited you came by and are following! So happy you are going to make this fun little project. They are kind of addicting.
Great tutorial, Pam, and congratulations on your new blog!
Thank you Cheryl. It’s exciting to finally enter the blogging world!
easy project love it just what I was looking for ,for some out of town gifts. thank you
So glad that you found an idea to use. These are so versatile too! Thank you for stopping by!
These look great Pam! I will be making some of these as I plan to do mostly gift cards this year. Best of luck to you with your new Blog endeavor!!
Thank you Diana! It has been a great ‘grand opening’!
Cute, cute, cute, Pam! I’ll be giving these a try!
Thank you Dawn! I bet you could come up with some really cute variations!
what an opening day and project!!! thanks for the timely project to help keep our sanity.
So glad to be of service Ginny! You are too funny! Thanks for stopping by and for the encouraging comment!
I found your post via Stamping Pretty. Thanks for posting this. I love this idea.
I’d like to suggest that you include the stamp set number (or link to it in your store).
Thanks again for sharing!
Thank you for the very good advice Teresita. I am going to figure out how to link my store before I post again. I am also going to start posting the item numbers as you suggest too. You are a doll for visiting and helping this new blogger out! Happy Stamping!
Very clever! And it upsells our wonderful Envies, too! I think I can make it fit on a regular card front so that it can be both the Christmas card and gift in one…thanks for the great inspiration!
Thank you for stopping by and sharing your comments. There are so many things you can do with these. Have fun and happy stamping!
Congratulations Pam on a beautiful blog and a great first post! Wonderful idea!
Thank you Peggy! It’s Benny a really fun day for me!
Congratulations Pam on joining us in the Blogging community. You are my up-up line as I am on Brian’s team. I’ve heard so many good things about you and now can’t wait to see what you are up to through your blog.
Blessings, Kelly DeTommaso 🙂
That would make me your Stampin’ Mema! I feel like I am finally in the loop. I am always a little late to the party but I eventually get there. So glad you came over here. I look forward to seeing more of you!
Awesome project and awesome job on your blog. I love seeing your work and hope to see more now…congrats on the blog start!
Thank you Windy! Today has been a great day! I’ve been so hesitant to dive into the blogging world but there is no turning back now…lol. Thank you for visiting!
This is EXACTLY what I’ve been looking for, easy, simple but cute gift card holders. Congratulations on your new blog and first post. I wish you much success.
Thank you Nancy! You made my day! So glad I could give a little inspiration. Your well wishes mean so much! Happy stamping!!!
What a clever idea!
Thank you Rosanne! Happy Stamping!
Thanks for the tutorial. And good luck with your new blog. Very nice!
Thank you Karen. I appreciate your visit and taking the time to comment. Happy stamping!
Pam, those are just adorable! Love the name of your blog! So cute!
Thank you so much for sharing and congratulations on your first blog post! It turned out beautifully and you did a great job with the instructions and pictures!
You are so sweet Donna! Thank you for the compliments. It was really hard coming up with a name I liked that wasn’t taken. I am excited about blogging although I think I got a little spoiled today being Mary’s guest stamper. But what a great way to start!
You did get a great start, Mary is awesome to give you the boost! I wish my original upline had been so supportive! I’ve been following Mary for years and she certainly has a lot of great ideas and great team members!
Thanks for the tutorial. I’m going to try and make some for my grandsons.
I’m so glad you like them. I hope your grandsons like them too! Thanks so much for visiting my blog today!
These are absolutely adorable! So quick and simple. Also, love the color scheme and font on your new blog.
Thank you Joan. I appreciate your compliment! Happy Stamping!
Awesome idea, Pam! So cute….great gift for “flying friends”! Excited for you and your new blog, have lots of fun with it.
Thank you Cheryl! Fly safe through the week. It’s been a nasty one. Luckily I am off through the 20th.
Awesome gift card holders. Just made some and they were super easy. Your instructions were great. I will be a regular follower. Thanks again!!!
You have no idea how happy you just made me Cathy! I am thrilled that you made these easily. Being my first post, I was not sure how my tutorial would play out. Thank you for letting me know. I look forward to sharing more!
Thank you for sharing this adorable project.
Your welcome Connie! Thanks for stopping by!
Hi Pam! Thanks for sharing your tutorial — they are great and I can’t wait to make some for the holidays! Have fun with your blog — can’t wait to see what you post next!
Thank you for your encouraging comment Donna! I look forward to sharing more!
great idea. Thanks so much for sharing
So glad you liked it! Happy stamping!
These are great and so quick to make during this bet time. Can’t wait to see your next post.
Thank you Debbie. It is one of my favorite projects and seemed like a good way to roll out my blog!
Great photos! Great tutorial!
Thank you Janet! You are so sweet to come by and leave a comment. Glad you liked it!
Thanks for sharing. I am looking forward to,reading your blog and I just subscribed.
Thank you Kelly!
What a wonderful post. Thank you for sharing your ideas. I have signed up to follow your blog from Australia! xxx
Leesa, I am so happy you came to my blog from the other side of the world! I am still amazed that the internet can make it so easy to connect from so far away. Thank you for following me!
Totally AWESOME! Helped me for a Christmas class! Congrats on your first blog and your success! I have been a St/Up crafter for 7 years and just started doing classes. You are an inspiration!
Thank you for the wonderful compliments Judy! I am so happy that you found inspiration here. Congrats on doing classes. That is my favorite thing about being a demo. I love to teach and share. Good luck with your Christmas class. I hope they like them!
This is a great project, with very clear instructions. I’ll be sharing it with my team. Looking forward to seeing more of your lovely projects!
Thank you Sally! As my first post, I wasn’t too sure how clear the tutorial would be so your post means a lot to me!
Love the idea. Great first post.
Thank you Barbara!
Great project Pam! I make a different gift card holder but I love yours for cash and other shaped gift cards that aren’t just credit card size. One day perhaps I will join the blogging world, but for now I am content to follow you and other PALS and CASE your ideas. LOL
Thank you Jeanie, I am so glad you like it! It only took me 11 years to start a blog so there is still hope!
Congrats on a great blog Pam! I’m a big fan of Mary and Brian’s blogs, so thank you for adding another blog to my daily inspriation! Love this gift card holder and will definitley be making a few of these!
Thank you so much for joining me on My grand opening! Mary and Brian insure me daily too. I am starting with baby steps and plan on posting twice a week, on Sun and Wed. I am so happy you liked my project!
Love the different gift card holder idea! I try to offer different ideas to my customers and I’ll be using this tomorrow night!! TFS! Keep blogging!!
I am so happy that you liked my project enough to share! You have the same name as my sweet sister! Thank you for visiting. I will have new on Wed and Sun!
Love the tutorial and idea. Thanks. Where is the widget to follow your blog by email. I would really like to follow you. Please email me: cynthia.hawkins999@gmail.com when you have a widget so I can sign up. Thanks again and Merry Christmas.
I am so happy that you liked my project and want to follow me. I will try to troubleshoot the widget issue tomorrow and will email you when I figure it out myself. I have a bunch of people who are following me so I know it is somewhere. Stand by….
Yay!! Super cute & easy project…my favorite kind! Thanks for sharing & Happy New Blog!
Thank you Sarah! Your comment is so appreciated!
Thanks for sharing this cute idea! Had to try it right away… Claudia
I am so glad to hear that you made one!!! Thank you so much for visiting! Happy Stamping!
Hi there! This is a super-cute idea! I haven’t had time to read all of your comments, but I’m wondering if there’s a way to use the SU envelope maker for the beginning envelope, part? (I’d prefer to save the envies I have that need a lick/stick to go with cards in the regular mail). 🙂
I bet you could. I think you are onto a whole new design idea doing so! The only thing that you would need to tweak is the flap will be pointed instead of flat but I don’t think that will be a big issue. Good luck!
Hello Pam, This is definitely a GREAT first post for your new blog! I’m thrilled to be here today. I love your gift card holders and plan to CASE before the Chistmas holiday is over. Thanks for your neat & simple – my fav – idea! Best Wishes on your renewed adventure… Barb
Thank you for your wonderful compliment! I am just as thrilled that you loved my project. I am a very clean and simple stamper so I hope you come back and visit! You made my day!
Love this idea…they are darling! And what a wonderful introduction into blogging! Congratulations!
Thank you Beth. I think I am one of the last of the Pals to start a blog. I appreciate your encouraging feedback!
Hi Pam, Awesome first post to introduce us to your new blog and the gift card holder is such a great gift for anytime of the year!! I came here through Mary Fish’s blog and am glad I found you. All the best with your blog and thank you for sharing this wondeful gift card holder. Merry Christmas!
Thank you so much for your encouraging comment! I’m so glad you like the gift holer!
This is just what I needed!!! I don’t like the store bought ones, these are perfect. Thank you so much for teaching how to make them.
Just made one, SUPER QUICK and your tutorial is GREAT!
Thanks for Sharing.